
If you manage a strata building, you’ve probably lived this scene: it’s 7:15 am, a resident reports water pouring through a ceiling, and you’re on the phone trying to line up a plumber who can actually attend now, and who won’t void your insurance or leave you with a bigger mess.
That tightrope, getting help fast and staying covered, is what vendor compliance is really about. It’s how you make sure the tradies you send onto common property are properly licensed, insured, briefed and safe, with proof to back every decision you make.
To keep things practical, this guide follows two ideas you can use immediately:
- People → Process → Proof: know who does what, build checks into the steps, and capture the evidence.
- Two-Speed model: handle emergencies without cutting corners, and make planned/recurring work rock-solid before anyone attends the site.
What follows are ten focused, field-tested practices for strata managers. They’ll help you prevent incidents, avoid claim knock-backs, tame variations, and keep residents informed, without drowning in paperwork.
Let’s dive in.
What “Vendor Compliance” Really Means in Strata
Vendor compliance sounds heavy, but it’s simply this: making sure the people you hire are qualified, safe, insured, and doing the job the way it should be done, and having proof of it. In strata, that proof matters before the job, during the job, and after the job.
You’ll see one simple thread through this article: People → Process → Proof.
- People: who is responsible for what; you, the building manager, the committee, the vendor and any workers/subcontractors.
- Process: the steps from request to invoice, and how compliance checks are built in.
- Proof: the documents, photos, timestamps and sign-offs that make your approvals easy and audit-ready.
Get those three right, and you’ll avoid most of the headaches: unsafe work, invalid insurance, budget blowouts, and resident complaints. And the best part? You don’t need a legal degree. You need clarity, consistency and a place to store the evidence.
Why Does Vendor Compliance Matter for Strata Managers
Compliance isn’t about paperwork for paperwork’s sake. It’s about protecting people and property, keeping the building running smoothly, and making sure every dollar is well spent.
When a contractor is properly licensed and insured, you reduce the risk of injury and liability. When they follow site rules and use the right method (e.g., job-specific SWMS for high-risk work), you avoid incidents and stoppages. That means lifts keep moving, leaks get contained quickly, and residents aren’t left in the dark about what’s happening.
There’s also the financial side. Insurance claims can be knocked back if the vendor wasn’t compliant. Unverified variations can balloon an otherwise simple job. And when work isn’t done safely or correctly the first time, you pay for repeat attendance and deal with unhappy residents. Transparent compliance builds trust with your committee. They can see the checks done, the approvals given, and the reasons behind decisions; not just “because the manager said so.”
Finally, compliance speeds things up. When you standardise what’s checked and where it’s stored, approvals are faster and fewer jobs get stuck in limbo. It’s the difference between scrambling for a Certificate of Currency at 6 pm during a burst pipe, and clicking once to confirm it’s current and covers the scope. Safety up, stress down.
Emergencies vs Planned Work

Strata life runs at two speeds. There’s emergency/make-safe (roof leak in a storm, a pipe bursts, a sparky is needed urgently), and there’s planned/recurring work (garden maintenance, fire asset servicing, cleaning, routine electrical checks). You need compliance that flexes for both without lowering standards.
For emergencies, think “minimum must-haves to attend” and “follow-through to full documentation.” If the vendor is already pre-qualified, great, green light. If not, collect the absolute essentials before attendance: a valid trade licence, current public liability insurance, and a capped spend for make-safe. Then set a short window (24 – 48 hours) to receive any remaining documents (e.g., SWMS for high-risk, induction proof, photos). Close the loop quickly so insurance and records are solid.
For planned/recurring work, you have time to be thorough upfront. That means no site attendance until the vendor is fully pre-qualified and onboarded. It’s calmer, clearer and cheaper to do it right before a contractor steps onto common property. This two-speed model keeps residents safe in urgent situations and keeps standards high when the clock isn’t ticking.
Risk-Based Tiering to Right-Size Your Checks
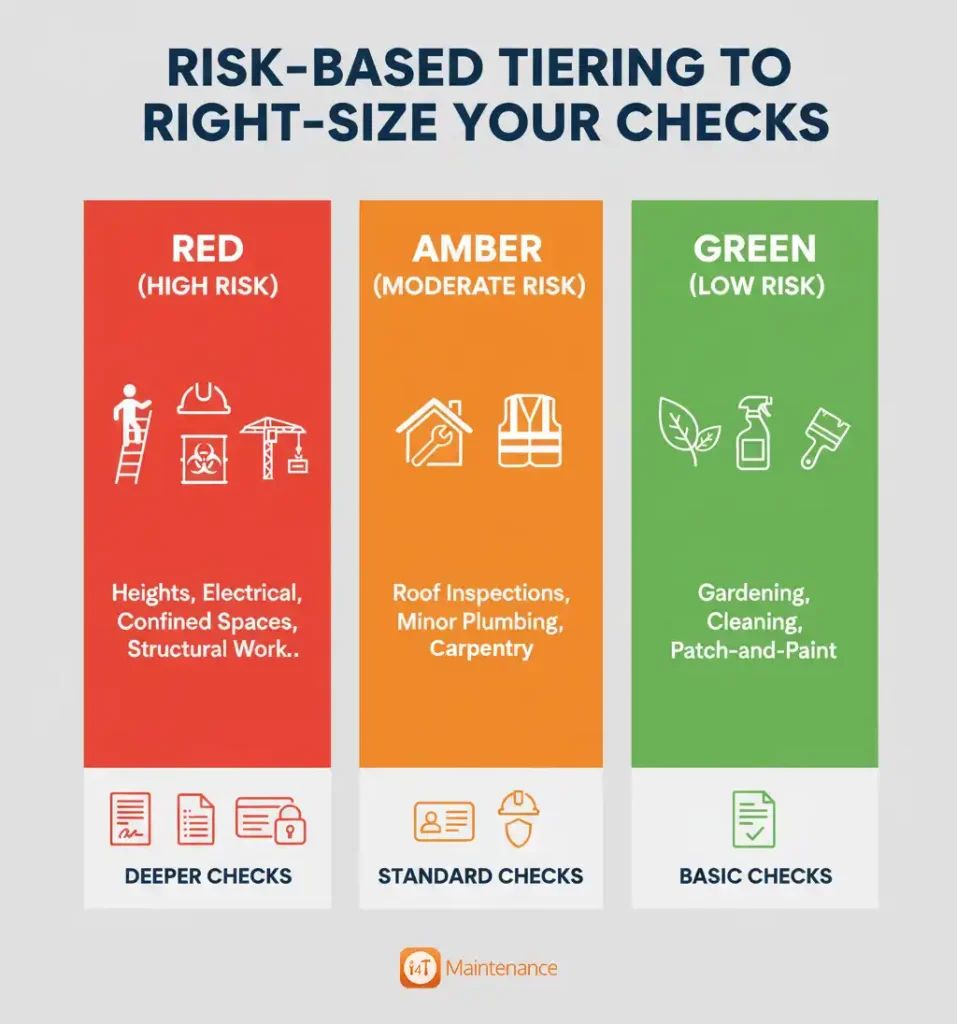
Not every job carries the same risk, so your checks shouldn’t be identical either. A simple RAG (Red/Amber/Green) tiering helps you right-size effort.
- Red (high risk): heights, electrical, hot works, confined spaces, asbestos, major plant or structural work. Expect deeper checks: job-specific SWMS signed by workers, proof of competencies/tickets, permits (e.g., hot works), lock-out/tag-out if applicable, and on-site verification before starting.
- Amber (moderate risk): roof inspections on flat accessible areas, minor plumbing, minor carpentry. Expect standard licences/insurance, a SWMS where required, induction proof, basic PPE and a quick toolbox talk.
- Green (low risk): gardening, cleaning, minor patch-and-paint in non-hazardous areas. Expect licences (where applicable), insurance and site rules acknowledgment.
Tiering also guides approvals: Red may require committee sighting or building manager oversight; Green may be manager-only. If the risk changes mid-job (e.g., a painter discovers mould behind a wall or a plumber uncovers asbestos), escalate the tier and pause until the right controls and documents are in place. Tiering keeps you proportionate: safe without drowning in admin.
Pre-Qualification Essentials
Pre-qualification is your foundation. It’s where you verify who the vendor is, what they’re allowed to do, and whether they’re covered if something goes wrong. Keep it simple, consistent and non-negotiable.
Start with entity details: ABN and legal name match, correct business address, and the right trade categories. Check trade licences (expiry, class, restrictions) and public liability insurance (limits appropriate to your sites, many schemes look at $10-20m, and the activities covered). Confirm workers’ compensation where required. For higher-risk work, add SWMS tailored to the actual tasks, induction evidence, and any tickets/competencies (e.g., EWP, working at heights, asbestos awareness).
A good habit is matching the scope to documents. Does the insurance cover hot works? Does the licence class allow the electrical task requested? Are names consistent across the certificate, licence and ABN lookup? If you collect references, ask specific, job-relevant questions: punctuality, safety behaviours, quality, and how they handle variations. Grey areas now become black-and-white, which will save you on the day a claim or dispute lands.
Onboarding Pack & Ground Rules to Follow
Tradies do their best work when expectations are clear and practical. A short, friendly onboarding pack sets the tone and reduces back-and-forth once jobs start landing.
Include your house rules (access hours, noise restrictions, parking, lift protection, waste disposal), safety standards (PPE, incident reporting, emergency procedures, required permits), and quality expectations (before/after photos, defect rectification, cleanliness of common areas). Add your privacy and data handling notes so photos and resident information are used appropriately. Be explicit on subcontractors: when they’re allowed, how they must be nominated, and that all the same checks apply to them.
Keep the pack digital with a simple submission checklist and plain English. Vendors appreciate clarity on variations (when to call before proceeding), invoicing rules (PO required, photo proof, sign-off needed), and communication (who to contact if the scope doesn’t match the work order). The friendlier and clearer this pack is, the faster your vendors will comply, because they’ll actually read it.
Build Compliance Into the Work Order Steps
Compliance works best when it’s baked into the way you issue and close work orders; not bolted on at the end. Map your request from risk screen, WO/PO, compliance gate, attendance, completion, and invoice, and decide what’s checked at each point.
When a request arrives, do a quick risk screen. Assign a RAG tier and note any site hazards (e.g., plant room access, roof anchors, live services). When you create the work order, include the scope, photos if possible, the site rules link, and who to call for variations. The compliance gate is your yes/no moment: has the vendor’s pre-qualification been met for the tier? If not, hold the WO until they complete it, or route to an emergency exception path.
At attendance, use check-in/out with timestamps and location, where possible. Confirm the SWMS matches the actual task (not a generic copy from a different job). During the job, keep notes and take progress photos when useful. At completion, capture before/after photos, any permits used, and a simple completion statement (“leak contained; replaced valve; no further faults found”). Only then move to the invoice. When every step captures just enough proof, approvals become quick and defensible.
On-Site Controls That Prevent Incidents
Most incidents are avoided by doing a few simple things well on site. Start with a short toolbox talk: what’s the job, what are the hazards, who’s doing what, and what to do if conditions change. Make sure the SWMS is job-specific and signed by the people actually doing the work; it should reflect the tools, heights, chemicals or plant in use that day.
Use permits where required: hot works, confined spaces, and roof access. Confirm isolations and lock-out/tag-out before touching live services. Check PPE, not just wearing a hard hat, but the right gloves, eye protection, harness, or respiratory gear for the task. Protect common areas: lift pads, floor coverings, dust control. Communicate with residents for any noisy or disruptive tasks, so you don’t have complaints mid-job. And if the scope changes (hello, hidden leaks and dodgy wiring), stop and call. A quick pause for the right approval is far cheaper than pushing on and creating a bigger problem.
Good on-site controls aren’t about making life harder for tradies. They make jobs predictable, keep people safe, and protect your building. That’s a win for everyone.
Keep Record & Score Performance

Collecting documents is only half the story. You also need to store them logically and use them to improve performance. Keep a clean digital trail of licences, certificates of currency, SWMS, induction records, permits, photos, completion reports and invoices. Tag everything by vendor, job and asset so you can retrieve it in a few clicks. Set expiry alerts for licences and insurance so you’re not caught out.
Turn your records into a simple scorecard. A handful of KPIs will tell you how healthy your vendor panel is:
- Paperwork completeness
- On-time attendance and first-time fix rate
- Incident/near-miss rate and defect returns
- SWMS match rate
- Resident feedback
Meet top vendors quarterly and share the scorecard. Celebrate the good stuff and agree on one or two improvements. For under-performers, set short corrective action plans. Over time, this turns compliance from a box-ticking exercise into a lever for better outcomes: fewer callbacks, safer sites, and happier residents.
Non-Compliance Playbook & How to Course-Correct
Even with solid processes, things will slip. A playbook helps you respond calmly and consistently. Start by triaging: is this a documentation gap (missing certificate), an unsafe act (working at height without edge protection), or a serious breach (fraudulent paperwork, wilful disregard of instructions)? The response should fit the issue.
For gaps, pause the job if necessary and set a tight timeframe to fix. For unsafe acts, use stop-work until controls are in place and re-induct if needed. For serious breaches, escalate to the committee and consider payment holds, suspension or removal from the panel. If an incident is notifiable, follow the regulator’s process promptly. Close the loop by updating your onboarding pack or WO templates so the same issue doesn’t repeat.
Back all this with contracts/POs that support you: rights to request evidence, approve subcontractors, audit documents, manage data properly, and terminate for cause. Keep language plain and reflect it in your day-to-day instructions, so what’s on paper matches how you actually run jobs.
Wrapping it up
Vendor compliance is simply good management with proof. Use People, Process and Proof to stay clear and consistent.
Run a Two-Speed model so emergencies get attention without cutting corners, and planned work is rock-solid before anyone attends the site. That’s how you keep residents safe, protect budgets, pass audits, and reduce your own stress.
Ready to make vendor compliance simpler for every job, emergency, routine and recurring? i4T Maintenance is a Strata Vendor Compliance Software, helps strata managers and tradies work from the same playbook: vendor onboarding with document checks, expiry alerts, job-level risk prompts, digital SWMS, geotagged check-ins, photo proof, resident updates and full audit trails through to invoice. Keep your buildings safe and your approvals fast, all in one place.
FAQs
At minimum: correct trade licence, current public liability insurance, and workers’ comp (if applicable). For higher-risk work, add a job-specific SWMS, relevant tickets/competencies, and site induction proof.
Whenever the task is high-risk (e.g., heights, electrical, hot works, confined spaces, asbestos). It must match the actual job and be signed by the workers doing it.
Yes, if you apply a two-speed approach. Confirm licence, insurance and a capped spend first, then collect the rest (e.g., SWMS, photos) within 24-48 hours.
Require pre-approval and make sure subs meet the same checks as the head contractor. Record who attended, when, and under which company.
Keep them digitally, tagged by vendor, job and asset. A practical rule is for the life of the asset plus seven years (or as your insurer/regulator advises).